모두의 코드
씹어먹는 C++ - <6 - 1. C++ 표준 문자열 & 부모의 것을 물려쓰자 - 상속>
이번 강좌에서는
C++ 표준 문자열 (std::string)
상속 (inheritance)
오버라이딩(overriding)
protected키워드
에 대해서 배웁니다.

안녕하세요 여러분!! 제가 그간 많이 바빠서 강좌를 진행하지 못하고 있었는데요, 요새 여유가 조금 생겨서 다시 C++ 강좌를 진행할 수 있게 되었습니다. 오랫동안 기다리셨던 분들에게는 정말로 죄송하다고 전하고 싶네요. 이전 강좌까지 클래스와 연산자 오버로딩에 대해 배우면서 C++ 의 새로운 맛을 보았다면, 이제부터는 본격적으로 C++ 의 진한 국물을 우려내는 듯한 강좌가 될 것 같습니다.
표준 `string` 클래스
아마 제 강좌를 훌륭하게 따라 오신 분들이라면 지난 강좌에서 MyString 클래스를 만드셨던 것이 기억이 나실 것입니다. C 언어 스타일의 문자열은 여러가지 문제점들이 많기 때문에 (예를 들어 문자열의 길이를 한 번에 알 수 없고 마지막 NULL 문자까지 하나 하나 읽어야 된다는 든지..) 문자열을 처리할 수 있는 새로운 무언가가 계속 필요해야 했습니다.
사실 우리가 예전에 만든 MyString 클래스도 문자열 처리를 꽤나 훌륭하게 하지만, 실제로 속도가 매우 중요한 환경에서 그대로 쓰기에는 부족한 점이 많습니다. 하지만 많은 프로그래머들의 노력 끝에 string 이라는 빠르고, 안전하고 사용하기 매우 간단한 문자열 클래스가 표준으로 채택이 됩니다.
(이 string 에 들어가 있는 몇 가지 기술을 소개해보자면, 짧은 문자열에 대해서는 동적으로 메모리를 할당하지 않고 그냥 지역 변수로 보관을 하고, 문자열을 복사를 할 때 그 복사된 문자열의 내용이 바뀌지 않는 한 실제로 데이터를 복사하는 것이 아니라 원래 문자열을 가리키기만 한다 등등 속도를 향상시키기 위한 여러 노력이 접목되어 있습니다)
#include <iostream>
#include <string>

int main() {
  // 표준이므로 std 안에string 이 정의되어 있습니다.
  std::string s = "abc";

   std::cout << s <<  std::endl;

  return 0;
}
성공적으로 컴파일 하였다면
실행 결과
abc
와 같이 abc 가 잘 출력됨을 알 수 있습니다.
일단 기본적으로 "abc" 는 컴파일러 상에서는 C 형식 문자열로 인식됩니다. 즉, 위 문장은 string 클래스의 인자를 const char * 로 받는 생성자를 호출한 것으로 볼 수 있겠지요.
#include <iostream>
#include <string>

int main() {
  std::string s = "abc";
  std::string t = "def";
  std::string s2 = s;

   std::cout << s << " 의 길이 : " << s.length() <<  std::endl;
   std::cout << s << " 뒤에 " << t << " 를 붙이면 : " << s + t <<  std::endl;

  if (s == s2) {
     std::cout << s << " 와 " << s2 << " 는 같다 " <<  std::endl;
  }
  if (s != t) {
     std::cout << s << " 와 " << t << " 는 다르다 " <<  std::endl;
  }
  return 0;
}
성공적으로 컴파일 하였다면
실행 결과
abc 의 길이 : 3
abc 뒤에 def 를 붙이면 : abcdef
abc 와 abc 는 같다
abc 와 def 는 다르다
위에는 몇 가지 string 클래스의 기능들을 간단히 보여드린 것입니다. 예를 들어 문자열의 길이를 출력하는 length 함수라던지, 연산자 오버로딩을 사용해서 + 연산자가 실제로 문자열을 결합시키는 함수로 사용되고 있습니다.
특히 편리한 점으로 C 형식 문자열이였을 경우 문자열을 비교하기 위해서 strcmp 함수를 사용했어야 하고,
if (s == s2)  std::cout << s << " 와 " << s2 << " 는 같다 " <<  std::endl;
if (s != t)  std::cout << s << " 와 " << t << " 는 다르다 " <<  std::endl;
와 같이 == 나 != 로 비교하는 것이 불가능 하였습니다. (왜냐하면 이는 문자열의 주소값을 비교하는 것이였으니까요! - 혹시 기억이 잘 나지 않는 분들은 이 강좌를 다시 보고 오세요!) 하지만 이 string 클래스는 == 와 != 연산자들을 모두 오버로딩해서 제대로 비교를 수행합니다. 뿐만 아니라 크기 비교 >=, <= 등도 제대로 수행이 되지요.
사실 string 에서 제공하는 함수와 기능들인 제가 소개한 것 말고도 엄청나게 많아서 한 강좌에 다 채워놓지 못할 정도 입니다. 위에서는 가장 많이 쓰는 기능만 소개해놓았고 모든 정보를 원하신다면 여기를 참조하시면 됩니다.
표준 문자열 std::string 에는 length 함수 말고도, 문자열 사이에 문자열을 삽입하는 insert 함수나, 특정 위치를 지우는 erase 나 문자열을 치환하는 replace 등등 수 많은 유용한 함수들이 많습니다.
사원 관리 프로그램
자, 이제 여러분은 한 회사의 사원 관리 프로그램을 만들어달라는 의뢰를 받게 됩니다.

우리가 만들어야 할 프로그램의 목적은 회사의 사원들의 월급을 계산해서 한달에 총 얼마나 되는 돈을 월급으로 지출해야 하는지 알려주는 단순한 프로그램 입니다. 그렇다면 일단 여러분은 각 사원들에 정보를 클래스로 만들어서 데이터를 보관하도록 하겠지요.
사원들의 필요한 데이터는 이름, 나이, 직책과 직책의 순위에 해당하는 숫자값 (예를 들어 평사원이면 1, 대리면 2 이런 식으로) 정도 입니다. 이를 바탕으로 간단히 클래스를 구성해본다면 다음과 같이 짤 수 있을 것입니다.
class Employee {
  std::string name;
  int age;

  std::string position;  // 직책 (이름)
  int rank;              // 순위 (값이 클 수록 높은 순위)

 public:
  Employee(std::string name, int age, std::string position, int rank)
      : name(name), age(age), position(position), rank(rank) {}

  // 복사 생성자
  Employee(const Employee& employee) {
    name = employee.name;
    age = employee.age;
    position = employee.position;
    rank = employee.rank;
  }

  // 디폴트 생성자
  Employee() {}

  void print_info() {
    std::cout << name << " (" << position << " , " << age << ") ==> "
              << calculate_pay() << "만원" << std::endl;
  }
  int calculate_pay() { return 200 + rank * 50; }
};
일단 저는 3 개의 생성자들을 정의해놓았는데요, 여태까지 강의를 잘 따라오신 분들은 각 생성자가 어떤식으로 동작하는지, 단번에 눈치챌 수 있으셨겠죠?
여기서 눈여겨볼 점은 calculate_pay 함수 인데, 기본급 200 에 직위에 따라 50 을 곱해서 더 받도록 하였습니다. (아 이건 물론 제가 임의로 정한것이고 일반적인 회사에서 이렇게 한다고 주장하는 것이 아닙니다 ㅎ)
자 이제 각각의 Employee 클래스를 만들었으니, 이 Employee 객체들을 관리할 수 있는 무언가가 있어야 겠지요? 물론 단순히 배열을 사용해서 사원들을 관리할 수 있겠지만, 그렇게 된다면 굉장히 불편하겠지요? 그래서 저는 EmployeeList 클래스를 만들어서 간단하게 처리하도록 할 것입니다.
일단 우리는 다음과 같은 멤버 변수들을 이용해서 사원 데이터를 처리할 것입니다.
int alloc_employee;        // 할당한 총 직원 수
int current_employee;      // 현재 직원 수
Employee **employee_list;  // 직원 데이터
MyString 을 만들었던 기억을 되살려보자면, 언제나 동적으로 데이터를 할당하는 것을 처리하기 위해서는 두 개의 변수가 필요 했는데, 하나는 현재 할당된 총 크기고, 다른 하나는 그 중에서 실제로 사용하고 있는 양이지요. 이렇게 해야지만 할당된 크기 보다 더 많은 양을 실수로 사용하는 것을 막을 수 있습니다. 따라서 우리도 alloc_employee 가 할당된 크기를 알려주는 배열이고, current_employee 는 현재 employee_list 에 등록된 사원 수라고 볼 수 있지요.
employee_list 가 Employee** 타입으로 되어 있는 이유는, 우리가 이를 Employee* 객체를 담는 배열로 사용할 것이기 때문입니다. 그렇다면 EmployeeList 클래스의 생성자는 아래와 같이 쉽게 구성할 수 있겠지요.
EmployeeList(int alloc_employee) : alloc_employee(alloc_employee) {
  employee_list = new Employee*[alloc_employee];
  current_employee = 0;
}
그리고 사원을 추가하는 함수는 아래처럼 단순하게 구성할 수 있습니다.
void add_employee(Employee* employee) {
  // 사실 current_employee 보다 alloc_employee 가 더
  // 많아지는 경우 반드시 재할당을 해야 하지만, 여기서는
  // 최대한 단순하게 생각해서 alloc_employee 는
  // 언제나 current_employee 보다 크다고 생각한다.
  // (즉 할당된 크기는 현재 총 직원수 보다 많음)
  employee_list[current_employee] = employee;
  current_employee++;
}
물론 위 주석에도 잘 설명되어 있듯이, alloc_employee 보다 current_employee 가 더 많아진다면 새로 재할당을 하고 데이터를 모두 복사해야겠지만 (여러분의 코드는 그렇게 쓰세요!) 제가 주목하고 싶은 부분은 여기가 아니라서 그냥 위 처럼 간단하게 생각합시다.
그리고 나머지 짜잘한 함수들을 완성해준다면 다음과 같이 EmployeeList 클래스를 구성할 수 있게 됩니다.
class EmployeeList {
  int alloc_employee;        // 할당한 총 직원 수
  int current_employee;      // 현재 직원 수
  Employee** employee_list;  // 직원 데이터

 public:
  EmployeeList(int alloc_employee) : alloc_employee(alloc_employee) {
    employee_list = new Employee*[alloc_employee];
    current_employee = 0;
  }
  void add_employee(Employee* employee) {
    // 사실 current_employee 보다 alloc_employee 가 더
    // 많아지는 경우 반드시 재할당을 해야 하지만, 여기서는
    // 최대한 단순하게 생각해서 alloc_employee 는
    // 언제나 current_employee 보다 크다고 생각한다.
    // (즉 할당된 크기는 현재 총 직원수 보다 많음)
    employee_list[current_employee] = employee;
    current_employee++;
  }
  int current_employee_num() { return current_employee; }

  void print_employee_info() {
    int total_pay = 0;
    for (int i = 0; i < current_employee; i++) {
      employee_list[i]->print_info();
      total_pay += employee_list[i]->calculate_pay();
    }

     std::cout << "총 비용 : " << total_pay << "만원 " <<  std::endl;
  }
  ~EmployeeList() {
    for (int i = 0; i < current_employee; i++) {
      delete employee_list[i];
    }
    delete[] employee_list;
  }
};
그렇다면 실제 프로그램을 구성해볼까요. 현재 무한 상사에는 다음과 같은 사원들이 있습니다.

따라서 전체 코드는 다음과 같습니다.
#include <iostream>
#include <string>

class Employee {
  std::string name;
  int age;

  std::string position;  // 직책 (이름)
  int rank;              // 순위 (값이 클 수록 높은 순위)

 public:
  Employee(std::string name, int age, std::string position, int rank)
      : name(name), age(age), position(position), rank(rank) {}

  // 복사 생성자
  Employee(const Employee& employee) {
    name = employee.name;
    age = employee.age;
    position = employee.position;
    rank = employee.rank;
  }

  // 디폴트 생성자
  Employee() {}

  void print_info() {
    std::cout << name << " (" << position << " , " << age << ") ==> "
              << calculate_pay() << "만원" << std::endl;
  }
  int calculate_pay() { return 200 + rank * 50; }
};

class EmployeeList {
  int alloc_employee;        // 할당한 총 직원 수
  int current_employee;      // 현재 직원 수
  Employee** employee_list;  // 직원 데이터

 public:
  EmployeeList(int alloc_employee) : alloc_employee(alloc_employee) {
    employee_list = new Employee*[alloc_employee];
    current_employee = 0;
  }
  void add_employee(Employee* employee) {
    // 사실 current_employee 보다 alloc_employee 가 더
    // 많아지는 경우 반드시 재할당을 해야 하지만, 여기서는
    // 최대한 단순하게 생각해서 alloc_employee 는
    // 언제나 current_employee 보다 크다고 생각한다.
    // (즉 할당된 크기는 현재 총 직원수 보다 많음)
    employee_list[current_employee] = employee;
    current_employee++;
  }
  int current_employee_num() { return current_employee; }

  void print_employee_info() {
    int total_pay = 0;
    for (int i = 0; i < current_employee; i++) {
      employee_list[i]->print_info();
      total_pay += employee_list[i]->calculate_pay();
    }

    std::cout << "총 비용 : " << total_pay << "만원 " << std::endl;
  }
  ~EmployeeList() {
    for (int i = 0; i < current_employee; i++) {
      delete employee_list[i];
    }
    delete[] employee_list;
  }
};
int main() {
  EmployeeList emp_list(10);
  emp_list.add_employee(new Employee("노홍철", 34, "평사원", 1));
  emp_list.add_employee(new Employee("하하", 34, "평사원", 1));

  emp_list.add_employee(new Employee("유재석", 41, "부장", 7));
  emp_list.add_employee(new Employee("정준하", 43, "과장", 4));
  emp_list.add_employee(new Employee("박명수", 43, "차장", 5));
  emp_list.add_employee(new Employee("정형돈", 36, "대리", 2));
  emp_list.add_employee(new Employee("길", 36, "인턴", -2));
  emp_list.print_employee_info();
  return 0;
}
성공적으로 컴파일 하였다면
실행 결과
노홍철 (평사원 , 34) ==> 250만원
하하 (평사원 , 34) ==> 250만원
유재석 (부장 , 41) ==> 550만원
정준하 (과장 , 43) ==> 400만원
박명수 (차장 , 43) ==> 450만원
정형돈 (대리 , 36) ==> 300만원
길 (인턴 , 36) ==> 100만원
총 비용 : 2300만원
와 같이 잘 실행된다는 것을 볼 수 있습니다.
아 이렇게 사원 관리 프로그램을 잘 만들어서 제출해달라는 찰나, 무한 상사로 부터 연락을 한 통 받습니다. 차장 이상 급들은 관리데이터에 근속 년수를 포함시켜서 월급에 추가해달라고 말이지요. 그래서 저는 울며가며 겨자먹기로 Manager 클래스를 추가하였습니다. 사실 Employee 클래스랑 거의 똑같지만, 어쩔 수 없지요. 더 짜증나는 부분은 EmployeeList 클래스에서도 Employee 와 Manager 를 따로 처리해야 된다는 점입니다. 아무튼, 일단 Manager 클래스를 구성해봅시다.
class Manager {
  std::string name;
  int age;

  std::string position;  // 직책 (이름)
  int rank;              // 순위 (값이 클 수록 높은 순위)
  int year_of_service;

 public:
  Manager(std::string name, int age, std::string position, int rank,
          int year_of_service)
      : year_of_service(year_of_service),
        name(name),
        age(age),
        position(position),
        rank(rank) {}

  // 복사 생성자
  Manager(const Manager& manager) {
    name = manager.name;
    age = manager.age;
    position = manager.position;
    rank = manager.rank;
    year_of_service = manager.year_of_service;
  }

  // 디폴트 생성자
  Manager() {}

  int calculate_pay() { return 200 + rank * 50 + 5 * year_of_service; }
  void print_info() {
    std::cout << name << " (" << position << " , " << age << ", "
              << year_of_service << "년차) ==> " << calculate_pay() << "만원"
              << std::endl;
  }
};
기존의 Employee 클래스와 다 똑같고, int year_of_service 하나만 추가된 것을 볼 수 있습니다. 물론 월급을 계산하는 calculate_pay 함수나, 정보를 출력하는 print_info 함수가 약간 바뀌게 되었습니다. 이번에는 EmployeeList 클래스를 살펴보도록 합시다.
당연하게도 Employee 배열과 Manager 배열을 따로 만들어야만 합니다. 따라서 각 배열에 사용하고 있는 크기를 나타낼 변수도 따로 지정해야만 하겠지요. 따라서
int alloc_employee;  // 할당한 총 직원 수

int current_employee;  // 현재 직원 수
int current_manager;   // 현재 매니저 수

Employee **employee_list;  // 직원 데이터
Manager **manager_list;    // 매니저 데이터
와 같이 바꿔주어야 합니다. (여기서 또한 간단하게 처리하기 위해서 각 배열에 할당한 크기는 모두 동일하다고 생각합니다). 그리고 무엇보다도 EmployeeList 클래스의 나머지 부분을 바꿔주면
class EmployeeList {
  int alloc_employee;  // 할당한 총 직원 수

  int current_employee;  // 현재 직원 수
  int current_manager;   // 현재 매니저 수

  Employee** employee_list;  // 직원 데이터
  Manager** manager_list;    // 매니저 데이터

 public:
  EmployeeList(int alloc_employee) : alloc_employee(alloc_employee) {
    employee_list = new Employee*[alloc_employee];
    manager_list = new Manager*[alloc_employee];

    current_employee = 0;
    current_manager = 0;
  }
  void add_employee(Employee* employee) {
    // 사실 current_employee 보다 alloc_employee 가 더
    // 많아지는 경우 반드시 재할당을 해야 하지만, 여기서는
    // 최대한 단순하게 생각해서 alloc_employee 는
    // 언제나 current_employee 보다 크다고 생각한다.
    // (즉 할당된 크기는 현재 총 직원수 보다 많음)
    employee_list[current_employee] = employee;
    current_employee++;
  }
  void add_manager(Manager* manager) {
    manager_list[current_manager] = manager;
    current_manager++;
  }
  int current_employee_num() { return current_employee + current_manager; }

  void print_employee_info() {
    int total_pay = 0;
    for (int i = 0; i < current_employee; i++) {
      employee_list[i]->print_info();
      total_pay += employee_list[i]->calculate_pay();
    }
    for (int i = 0; i < current_manager; i++) {
      manager_list[i]->print_info();
      total_pay += manager_list[i]->calculate_pay();
    }
    std::cout << "총 비용 : " << total_pay << "만원 " << std::endl;
  }
  ~EmployeeList() {
    for (int i = 0; i < current_employee; i++) {
      delete employee_list[i];
    }
    for (int i = 0; i < current_manager; i++) {
      delete manager_list[i];
    }
    delete[] employee_list;
    delete[] manager_list;
  }
};
와 같이 구성할 수 있습니다. 두 개의 배열을 관리하기 때문에 똑같은 코드를 변수 이름만 바꿔서 한 번 더 써야 합니다. 상당히 귀찮기 다름 없지요. 이를 바탕으로 전체 코드를 구성해보면 다음과 같습니다.
#include <iostream>
#include <string>

class Employee {
  std::string name;
  int age;

  std::string position;  // 직책 (이름)
  int rank;         // 순위 (값이 클 수록 높은 순위)

 public:
  Employee(std::string name, int age, std::string position, int rank)
      : name(name), age(age), position(position), rank(rank) {}

  // 복사 생성자
  Employee(const Employee& employee) {
    name = employee.name;
    age = employee.age;
    position = employee.position;
    rank = employee.rank;
  }

  // 디폴트 생성자
  Employee() {}

  void print_info() {
     std::cout << name << " (" << position << " , " << age << ") ==> "
         << calculate_pay() << "만원" <<  std::endl;
  }
  int calculate_pay() { return 200 + rank * 50; }
};

class Manager {
  std::string name;
  int age;

  std::string position;  // 직책 (이름)
  int rank;         // 순위 (값이 클 수록 높은 순위)
  int year_of_service;

 public:
  Manager(std::string name, int age, std::string position, int rank, int year_of_service)
      : year_of_service(year_of_service),
        name(name),
        age(age),
        position(position),
        rank(rank) {}

  // 복사 생성자
  Manager(const Manager& manager) {
    name = manager.name;
    age = manager.age;
    position = manager.position;
    rank = manager.rank;
    year_of_service = manager.year_of_service;
  }

  // 디폴트 생성자
  Manager() {}

  int calculate_pay() { return 200 + rank * 50 + 5 * year_of_service; }
  void print_info() {
     std::cout << name << " (" << position << " , " << age << ", " << year_of_service
         << "년차) ==> " << calculate_pay() << "만원" <<  std::endl;
  }
};
class EmployeeList {
  int alloc_employee;  // 할당한 총 직원 수

  int current_employee;  // 현재 직원 수
  int current_manager;   // 현재 매니저 수

  Employee** employee_list;  // 직원 데이터
  Manager** manager_list;    // 매니저 데이터

 public:
  EmployeeList(int alloc_employee) : alloc_employee(alloc_employee) {
    employee_list = new Employee*[alloc_employee];
    manager_list = new Manager*[alloc_employee];

    current_employee = 0;
    current_manager = 0;
  }
  void add_employee(Employee* employee) {
    // 사실 current_employee 보다 alloc_employee 가 더
    // 많아지는 경우 반드시 재할당을 해야 하지만, 여기서는
    // 최대한 단순하게 생각해서 alloc_employee 는
    // 언제나 current_employee 보다 크다고 생각한다.
    // (즉 할당된 크기는 현재 총 직원수 보다 많음)
    employee_list[current_employee] = employee;
    current_employee++;
  }
  void add_manager(Manager* manager) {
    manager_list[current_manager] = manager;
    current_manager++;
  }
  int current_employee_num() { return current_employee + current_manager; }

  void print_employee_info() {
    int total_pay = 0;
    for (int i = 0; i < current_employee; i++) {
      employee_list[i]->print_info();
      total_pay += employee_list[i]->calculate_pay();
    }
    for (int i = 0; i < current_manager; i++) {
      manager_list[i]->print_info();
      total_pay += manager_list[i]->calculate_pay();
    }
     std::cout << "총 비용 : " << total_pay << "만원 " <<  std::endl;
  }
  ~EmployeeList() {
    for (int i = 0; i < current_employee; i++) {
      delete employee_list[i];
    }
    for (int i = 0; i < current_manager; i++) {
      delete manager_list[i];
    }
    delete[] employee_list;
    delete[] manager_list;
  }
};
int main() {
  EmployeeList emp_list(10);
  emp_list.add_employee(new Employee("노홍철", 34, "평사원", 1));
  emp_list.add_employee(new Employee("하하", 34, "평사원", 1));

  emp_list.add_manager(new Manager("유재석", 41, "부장", 7, 12));
  emp_list.add_manager(new Manager("정준하", 43, "과장", 4, 15));
  emp_list.add_manager(new Manager("박명수", 43, "차장", 5, 13));
  emp_list.add_employee(new Employee("정형돈", 36, "대리", 2));
  emp_list.add_employee(new Employee("길", 36, "인턴", -2));
  emp_list.print_employee_info();
  return 0;
}
성공적으로 컴파일 하였다면
실행 결과
노홍철 (평사원 , 34) ==> 250만원
하하 (평사원 , 34) ==> 250만원
정형돈 (대리 , 36) ==> 300만원
길 (인턴 , 36) ==> 100만원
유재석 (부장 , 41, 12년차) ==> 610만원
정준하 (과장 , 43, 15년차) ==> 475만원
박명수 (차장 , 43, 13년차) ==> 515만원
총 비용 : 2500만원
와 같이 잘 실행됩니다.
상속 (Inheritance)
여러분도 느꼈겠지만, Manager 클래스를 추가하면서 복사 붙여넣기 신공을 참 여러번 반복한다고 느꼈을 것입니다. 이게 어쩔 수 없는 이유가 Manager 의 코드 자체가 Employee 의 대부분을 포함하고 있기 때문이지요. C++ 에서는 이와 같은 경우, 다른 클래스의 내용을 그대로 포함할 수 있는 작업을 가능토록 해줍니다. 바로 상속 이라는 것을 통해 말이지요.
사실 상속이라는 단어 속에 무언가를 물려 받아서 사용한다는 의미가 있습니다. 즉, C++ 에서 상속을 통해 다른 클래스의 정보를 물려 받아서 사용할 수 있습니다.
일단은 바로 Employee 와 Manager 클래스에 적용하기 전에 간단한 클래스를 먼저 만들어서 어떻게 C++ 에서 상속이라는 기능이 사용되는지 알아보도록 하겠습니다.
class Base {
  std::string s;

 public:
  Base() : s("기반") {  std::cout << "기반 클래스" <<  std::endl; }

  void what() {  std::cout << s <<  std::endl; }
};
위는 우리의 설명을 도와줄 기반 클래스 입니다. 그리고, 아래는 기반 클래스(Base)를 물려받은 파생(Derived) 클래스의 모습 입니다.
주의 사항
보통 부모 - 자식 클래스라고도 이야기 많이 합니다. 다만 자식 이란 단어 속에서 한 개의 부모만 가지는 의미가 담겨 있는데 (엄마가 2 명일 수는 없자나요), C++ 의 경우 여러 명의 부모 를 가질 수 있기에, 부모, 자식 클래스라 하기 보단, 기반, 파생 클래스라 부르는 것이 낫다고 생각합니다.
class Derived : public Base {
  std::string s;

 public:
  Derived() : Base(), s("파생") {
     std::cout << "파생 클래스" <<  std::endl;

    // Base 에서 what() 을 물려 받았으므로
    // Derived 에서 당연히 호출 가능하다
    what();
  }
};
가장 먼저 눈에 띄는 부분은 바로 맨 위 class 의 정의 부분으로
class Derived : public Base
와 같이 되어 있습니다. 이는 Derived 가 Base 를 public 형식으로 상속을 받겠다는 의미가 됩니다. public 형식으로 상속받는게 무엇인지에 대해서는 좀 있다가 이야기를 하도록 하고, 아무튼 위 처럼 상속을 받은 후에 Derived 는 다음과 같은 모습이 됩니다.
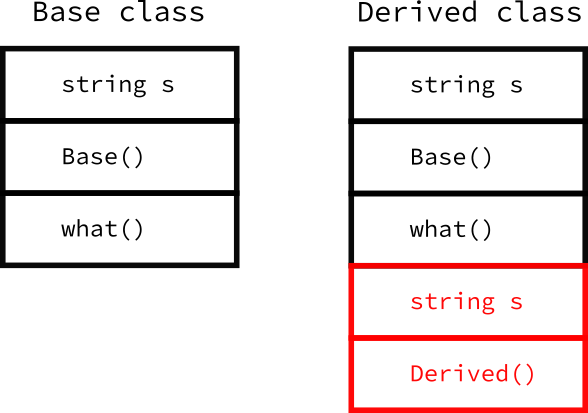
마치 Derived 클래스 안에 Base 클래스의 코드가 그대로 들어가 있는 것 처럼 말이지요. 따라서 아래 처럼 Derived 클래스에서 Base 클래스의 what 함수를 호출 할 수 있게 됩니다.
Derived() : Base(), s("파생") {
   std::cout << "파생 클래스" <<  std::endl;

  // Base 에서 what() 을 물려 받았으므로
  // Derived 에서 당연히 호출 가능하다
  what();
}
그리고 또 하나 눈여겨 봐야 할 점은 Derived 의 생성자 호출 부분 입니다. Derived 의 생성자는 위 처럼 초기화자 리스트에서 기반의 생성자를 호출해서 기반의 생성을 먼저 처리 한 다음에, Derived 의 생성자가 실행되어야 합니다. 따라서 아래 처럼
Derived() : Base(), s("파생")
초기화 리스트에서 Base 를 통해 기반의 생성자를 먼저 호출하게 됩니다. 참고로 기반 클래스의 생성자를 명시적으로 호출하지 않을 경우 기반 클래스의 디폴트 생성자가 호출됩니다.
그렇다면 아래의 코드를 살펴보도록 합시다.
#include <iostream>
#include <string>

class Base {
  std::string s;

 public:
  Base() : s("기반") {  std::cout << "기반 클래스" <<  std::endl; }

  void what() {  std::cout << s <<  std::endl; }
};
class Derived : public Base {
  std::string s;

 public:
  Derived() : Base(), s("파생") {
     std::cout << "파생 클래스" <<  std::endl;

    // Base 에서 what() 을 물려 받았으므로
    // Derived 에서 당연히 호출 가능하다
    what();
  }
};
int main() {
   std::cout << " === 기반 클래스 생성 ===" <<  std::endl;
  Base p;

   std::cout << " === 파생 클래스 생성 ===" <<  std::endl;
  Derived c;

  return 0;
}
성공적으로 컴파일 하였다면
실행 결과
 === 기반 클래스 생성 ===
기반 클래스
 === 파생 클래스 생성 ===
기반 클래스
파생 클래스
기반
와 같이 나옴을 알 수 있습니다.
일단 여러분은 기반 클래스 생성에서 왜 저런식으로 출력되는지는 당연히 알고 계실 것입니다. Base 의 생성자에서 '기반 클래스' 를 출력을 하게 되지요. 그렇다면 이번에는 Derived 객체를 만들 때 왜 저런식으로 출력되는지 살펴보도록 합시다.
 std::cout << " === 파생 클래스 생성 ===" <<  std::endl;
Derived c;
일단 위와 같이 Derived 의 인자가 없는 생성자를 호출하게 됩니다.
Derived() : Base(), s("파생") {
   std::cout << "파생 클래스" <<  std::endl;

  // Base 에서 what() 을 물려 받았으므로
  // Derived 에서 당연히 호출 가능하다
  what();
}
이제 위에서 Derived 의 s 에 파생 을 넣게 되고, Derived 생성자의 내부를 실행하기 전에 Base 의 생성자를 먼저 호출하게 됩니다. 따라서, 파생 클래스 생성 바로 아래에 파생 클래스 가 출력하기 이전에 Base 의 생성자가 호출되어서 기반 클래스 가 먼저 출력하게 되는 것이지요.
그렇다면 이제 what() 함수를 호출하는 부분을 살펴봅시다. Derived 에서 정의되어 있지 않는 what 을 어떻게 호출할 수 있냐면, 당연하게도, Base 의 모든 정보를 상속 받았기 때문에 Derived 에서도 what 을 호출 할 수 있게 되는 것입니다.
그런데, what 함수를 호출했을 때, 파생 이 아니라 기반 라고 출력이 되었는데, what 함수를 보면 s 의 값을 출력하도록 되어 있습니다. 이러한 일이 발생한 이유는, what 함수는 Base 에 정의가 되어 있기 때문에 Derived 의 s 가 아니라 Base 의 s 가 출력되어 "기반" 라고 나오게 되는 것입니다.
그렇다면 만일 Derived 에도 what 함수를 정의해주면 어떨까요.
#include <iostream>
#include <string>

class Base {
  std::string s;

 public:
  Base() : s("기반") {  std::cout << "기반 클래스" <<  std::endl; }

  void what() {  std::cout << s <<  std::endl; }
};
class Derived : public Base {
  std::string s;

 public:
  Derived() : Base(), s("파생") {
     std::cout << "파생 클래스" <<  std::endl;

    // Base 에서 what() 을 물려 받았으므로
    // Derived 에서 당연히 호출 가능하다
    what();
  }

  void what() {  std::cout << s <<  std::endl; }
};
int main() {
   std::cout << " === 기반 클래스 생성 ===" <<  std::endl;
  Base p;

   std::cout << " === 파생 클래스 생성 ===" <<  std::endl;
  Derived c;

  return 0;
}
성공적으로 컴파일 하였다면
실행 결과
기반 클래스
 === 파생 클래스 생성 ===
기반 클래스
파생 클래스
파생
이번에는 Derived 와 Base 에 둘다 what() 함수가 정의되어 있습니다. 이 경우, Derived 에서 아래처럼 what 을 호출하게 되면 무엇이 호출 될까요?
어떤 분들은 컴파일 상에서 문제가 발생하지 않을까 라고 생각할 수 도 있는데, 사실 두 함수는 같은 이름이지만 (심지어 인자들도 같지만), 다른 클래스에 정의되어 있는 것이기 때문에 다른 함수로 취급됩니다. (물론, Derived 안에 what 에 두 개 정의되어 있다면 문제가 되었겠지요)
위 경우에는 Derived 에 what 함수가 정의되어 있기 때문에 Derived 의 생성자에서 what 을 호출 할 때 (굳이) 멀리 Base 의 함수들 까지 뒤지지 않고, 바로 앞에 있는 Derived 의 what 함수를 호출하게 됩니다.
이런 것을 가리켜 오버라이딩(overriding)이라고 합니다. 즉, Derived 의 what 함수가 Base 의 what 함수를 오버라이딩 한 것이지요.
새로운 친구 protected
다음과 같은 코드를 생각해봅시다.
class Base {
  std::string parent_string;

 public:
  Base() : parent_string("기반") {  std::cout << "기반 클래스" <<  std::endl; }

  void what() {  std::cout << parent_string <<  std::endl; }
};
class Derived : public Base {
  std::string child_string;

 public:
  Derived() : child_string("파생"), Base() {
     std::cout << "파생 클래스" <<  std::endl;

    // 그렇다면 현재 private 인 Base 의
    // parent_string 에 접근할 수 있을까?
    parent_string = "바꾸기";
  }

  void what() {  std::cout << child_string <<  std::endl; }
};
만일 컴파일 하였다면 아래와 같은 컴파일 애러를 볼 수 있습니다.
컴파일 오류
error C2248: 'Base::parent_string' : cannot access private member declared in class 'Base'
아니 이게 도대체 무슨 말인가요! 기껏 상속 받았더니, 접근할 수 없다니요. 하지만 사실 private 멤버 변수들은 그 어떠한 경우에서도 자기 클래스 말고는 접근할 수 없습니다.
그렇지만 종종 파생 클래스(상속 받는 클래스 - 위 경우 Derived 클래스)에서 원래 기반의 클래스 (즉 여기서 Base) 의 데이터에 직접 접근할 필요성이 있습니다.
예를 들어서 우리의 예시의 경우 Employee 클래스를 기반 클래스로 해서 Manager 클래스가 상속 받았을 때, name 이나 age 에 접근할 필요성이 있겠지요.하지만 이들은 private 으로 되어 있기 때문에 접근이 불가합니다.
다행이도 C++ 에서는 protected 라는 public 과 private 에 중간 위치에 있는 접근 지시자를 지원합니다. 이 키워드는, 상속받는 클래스에서는 접근 가능하고 그 외의 기타 정보는 접근 불가능 이라고 보시면 됩니다. 부모(기반 클래스) 와 자식(파생 클래스) 으로 쉽게 비유하자면
private: (부모님들한테 안가르쳐 주는) 자신만의 비밀번호protected: 집 현관문 비밀번호 ( 가족들은 알지만 그 외의 사람들은 접근불가)public: 집 주소 (가족 뿐만이 아니라 다른 사람들도 알 수 있다)
이렇게 3 단계로 멤버의 접근 허용 범위를 지정할 수 있습니다. 그렇다면 실제로 private 을 protected 로 바꾼다면 잘 실행됨을 알 수 있습니다.
class Base {
 protected:
  std::string parent_string;

 public:
  Base() : parent_string("기반") {  std::cout << "기반 클래스" <<  std::endl; }

  void what() {  std::cout << parent_string <<  std::endl; }
};
class Derived : public Base {
  std::string child_string;

 public:
  Derived() : Base(), child_string("파생") {
     std::cout << "파생 클래스" <<  std::endl;

    // 그렇다면 현재 private 인 Base 의
    // parent_string 에 접근할 수 있을까?
    parent_string = "바꾸기";
  }

  void what() {  std::cout << child_string <<  std::endl; }
};
위 코드는 아주 잘 컴파일 됩니다.
그렇다면 이제
class Derived : public Base
에서 이 public 키워드의 의미를 밝힐 때가 됐군요. 사실 저 키워드가 public 이냐 protected 냐 private 이냐에 따라 상속 받는 클래스에서 기반 클래스의 멤버들이 실제로 어떻게 작동하는지 영향을 줍니다. 이게 무슨 말이냐면
만일 위처럼
public형태로 상속 하였다면 기반 클래스의 접근 지시자들에 영향 없이 그대로 작동합니다. 즉 파생 클래스 입장에서public은 그대로public이고,protected는 그대로protected이고,private은 그대로private입니다.만일
protected로 상속하였다면 파생 클래스 입장에서public은protected로 바뀌고 나머지는 그대로 유지됩니다.만일
private으로 상속하였다면 파생 클래스 입장에서 모든 접근 지시자들이private가 됩니다.
실제로 아래와 같은 예제를 살펴봅시다.
#include <iostream>
#include <string>

class Base {
 public:
  std::string parent_string;

  Base() : parent_string("기반") { std::cout << "기반 클래스" << std::endl; }

  void what() { std::cout << parent_string << std::endl; }
};
class Derived : private Base {
  std::string child_string;

 public:
  Derived() : child_string("파생"), Base() {
    std::cout << "파생 클래스" << std::endl;
  }

  void what() { std::cout << child_string << std::endl; }
};
int main() {
  Base p;
  // Base 에서는 parent_string 이 public 이므로
  // 외부에서 당연히 접근 가능하다.
  std::cout << p.parent_string << std::endl;

  Derived c;
  // 반면에 Derived 에서는 parent_string 이
  // (private 상속을 받았기 때문에) private 이
  // 되어서 외부에서 접근이 불가능하다.
  std::cout << c.parent_string << std::endl;

  return 0;
}
컴파일 하였다면
컴파일 오류
test.cc: In function 'int main()':
test.cc:31:13: error: 'std::__cxx11::string Base::parent_string' is inaccessible within this context
    std::cout << c.parent_string <<  std::endl;
             ^~~~~~~~~~~~~
test.cc:7:10: note: declared here
   string parent_string;
          ^~~~~~~~~~~~~
위에 코드 주석에 잘 설명되어 있지만 Base 객체에서 parent_string 을 접근한다면 public 이므로 main 함수에서도 잘 접근할 수 있지만 Derived 에서 parent_string 을 접근하려고 한다면, private 상속을 받았기 때문에 비록 Base 에서 public 이더라도, Derived 에서는 private 으로 처리됩니다. 따라서 접근할 수 없지요.
사원 관리 프로그램에 적용해보기
그렇다면 이제 우리가 새롭게 습득한 도구인 '상속' 을 Manager 와 Employee 클래스 사이에 적용해보도록 합시다. 아래는 기존 Manager 클래스를 그대로 가져온 것인데, 원래의 Employee 클래스와 중복되는 부분을 굵은 글씨로 나타내보았습니다.
class Manager {
  std::string name;
  int age;

  std::string position;  // 직책 (이름)
  int rank;              // 순위 (값이 클 수록 높은 순위)
  int year_of_service;

 public:
  Manager(std::string name, int age, std::string position, int rank,
          int year_of_service)
      : name(name),
        age(age),
        position(position),
        rank(rank),
        year_of_service(year_of_service) {}

  // 복사 생성자
  Manager(const Manager& manager) {
    name = manager.name;
    age = manager.age;
    position = manager.position;
    rank = manager.rank;
    year_of_service = manager.year_of_service;
  }

  // 디폴트 생성자
  Manager() {}

  int calculate_pay() { return 200 + rank * 50 + 5 * year_of_service; }
  void print_info() {
    std::cout << name << " (" << position << " , " << age << ", "
              << year_of_service << "년차) ==> " << calculate_pay() << "만원"
              << std::endl;
  }
};
이제 이를 바꿔보도록 합시다. 참고로, 한 가지 중요한 점은 Manager 의 calculate_pay 함수나 print_info 함수 등에서 Base 의 name, position 등을 참조하고 있기 때문에 Base 의 이 멤버 변수들을 private 속성으로 놔두면 안되고 protected 로 바꿔주어야만 합니다.
아무튼, Employee 를 상속받는 버전으로 바꾼 아래의 Manager 클래스 입니다.
class Manager : public Employee {
  int year_of_service;

 public:
  Manager(std::string name, int age, std::string position, int rank,
          int year_of_service)
      : year_of_service(year_of_service), Employee(name, age, position, rank) {}

  // 복사 생성자
  Manager(const Manager& manager)
      : Employee(manager.name, manager.age, manager.position, manager.rank) {
    year_of_service = manager.year_of_service;
  }

  // 디폴트 생성자
  Manager() : Employee() {}

  int calculate_pay() { return 200 + rank * 50 + 5 * year_of_service; }
  void print_info() {
    std::cout << name << " (" << position << " , " << age << ", "
              << year_of_service << "년차) ==> " << calculate_pay() << "만원"
              << std::endl;
  }
};
먼저 Employee 와 중복되었던 멤버 변수들이 Employee 를 상속함으로써 사라진 것을 볼 수 있습니다. 그리고 Manager 의 생성자들이 기반 클래스의 생성자를 먼저 호출한다 라는 원칙에 맞게 아래 처럼 바뀐 것을 볼 수 있습니다.
Manager(std::string name, int age, std::string position, int rank,
        int year_of_service)
    : year_of_service(year_of_service), Employee(name, age, position, rank) {}

// 복사 생성자
Manager(const Manager& manager)
    : Employee(manager.name, manager.age, manager.position, manager.rank) {
  year_of_service = manager.year_of_service;
}

// 디폴트 생성자
Manager() : Employee() {}
위에 굵은 글씨로 표시한 것이 모두 Manage 의 생성자에서 기반 클래스인 Employee 의 생성자를 먼저 호출하는 모습입니다. 상속을 통해서 귀찮게 복사 + 붙여 넣기를 하던 코드를 훨씬 간결하고 알아보기 쉽게 바꿀 수 있게 되었습니다. 전체 코드는 아래와 같습니다.
#include <iostream>
#include <string>

class Employee {
 protected:
  std::string name;
  int age;

  std::string position;  // 직책 (이름)
  int rank;              // 순위 (값이 클 수록 높은 순위)

 public:
  Employee(std::string name, int age, std::string position, int rank)
      : name(name), age(age), position(position), rank(rank) {}

  // 복사 생성자
  Employee(const Employee& employee) {
    name = employee.name;
    age = employee.age;
    position = employee.position;
    rank = employee.rank;
  }

  // 디폴트 생성자
  Employee() {}

  void print_info() {
    std::cout << name << " (" << position << " , " << age << ") ==> "
              << calculate_pay() << "만원" << std::endl;
  }
  int calculate_pay() { return 200 + rank * 50; }
};

class Manager : public Employee {
  int year_of_service;

 public:
  Manager(std::string name, int age, std::string position, int rank,
          int year_of_service)
      : Employee(name, age, position, rank), year_of_service(year_of_service) {}

  // 복사 생성자
  Manager(const Manager& manager)
      : Employee(manager.name, manager.age, manager.position, manager.rank) {
    year_of_service = manager.year_of_service;
  }

  // 디폴트 생성자
  Manager() : Employee() {}

  int calculate_pay() { return 200 + rank * 50 + 5 * year_of_service; }
  void print_info() {
    std::cout << name << " (" << position << " , " << age << ", "
              << year_of_service << "년차) ==> " << calculate_pay() << "만원"
              << std::endl;
  }
};
class EmployeeList {
  int alloc_employee;  // 할당한 총 직원 수

  int current_employee;  // 현재 직원 수
  int current_manager;   // 현재 매니저 수

  Employee** employee_list;  // 직원 데이터
  Manager** manager_list;    // 매니저 데이터

 public:
  EmployeeList(int alloc_employee) : alloc_employee(alloc_employee) {
    employee_list = new Employee*[alloc_employee];
    manager_list = new Manager*[alloc_employee];

    current_employee = 0;
    current_manager = 0;
  }
  void add_employee(Employee* employee) {
    // 사실 current_employee 보다 alloc_employee 가 더
    // 많아지는 경우 반드시 재할당을 해야 하지만, 여기서는
    // 최대한 단순하게 생각해서 alloc_employee 는
    // 언제나 current_employee 보다 크다고 생각한다.
    // (즉 할당된 크기는 현재 총 직원수 보다 많음)
    employee_list[current_employee] = employee;
    current_employee++;
  }
  void add_manager(Manager* manager) {
    manager_list[current_manager] = manager;
    current_manager++;
  }
  int current_employee_num() { return current_employee + current_manager; }

  void print_employee_info() {
    int total_pay = 0;
    for (int i = 0; i < current_employee; i++) {
      employee_list[i]->print_info();
      total_pay += employee_list[i]->calculate_pay();
    }
    for (int i = 0; i < current_manager; i++) {
      manager_list[i]->print_info();
      total_pay += manager_list[i]->calculate_pay();
    }
    std::cout << "총 비용 : " << total_pay << "만원 " << std::endl;
  }
  ~EmployeeList() {
    for (int i = 0; i < current_employee; i++) {
      delete employee_list[i];
    }
    for (int i = 0; i < current_manager; i++) {
      delete manager_list[i];
    }
    delete[] employee_list;
    delete[] manager_list;
  }
};
int main() {
  EmployeeList emp_list(10);
  emp_list.add_employee(new Employee("노홍철", 34, "평사원", 1));
  emp_list.add_employee(new Employee("하하", 34, "평사원", 1));
  emp_list.add_manager(new Manager("유재석", 41, "부장", 7, 12));
  emp_list.add_manager(new Manager("정준하", 43, "과장", 4, 15));
  emp_list.add_manager(new Manager("박명수", 43, "차장", 5, 13));
  emp_list.add_employee(new Employee("정형돈", 36, "대리", 2));
  emp_list.add_employee(new Employee("길", 36, "인턴", -2));
  emp_list.print_employee_info();
  return 0;
}
성공적으로 컴파일 하였다면
실행 결과
노홍철 (평사원 , 34) ==> 250만원
하하 (평사원 , 34) ==> 250만원
정형돈 (대리 , 36) ==> 300만원
길 (인턴 , 36) ==> 100만원
유재석 (부장 , 41, 12년차) ==> 610만원
정준하 (과장 , 43, 15년차) ==> 475만원
박명수 (차장 , 43, 13년차) ==> 515만원
총 비용 : 2500만원
와 같이 잘 실행됩니다.
자 그럼 이번 강좌는 여기에서 마치도록 하겠습니다. 사실 여기 까지만 읽으면 굳이 상속을 왜 쓰는지 이해하기 어렵다고 생각할 수 있습니다. 상속의 진짜 유용함은다음 강좌에서 다루도록 하겠습니다 :)

댓글을 불러오는 중입니다..